Part 3 of 5 · The 2026 Apple AI Stack
The Traditional Workhorse: Core ML
Not every AI feature needs a language model. I taught a phone to recognise my things — live, with no training and no server — using Core ML the classic way. Here is how it works, and when this proven workhorse still wins.

Charith 'Alex' Gunasekara
Head of Development & Engineering
In Part 1 I drew the map of Apple's 2026 AI stack. In Part 2 I built a feature on the newest layer — Foundation Models, the on-device language model that generates. This article goes to the other end of the stack, to the oldest and most boring layer: Core ML. The one that has been quietly shipping in apps for years.
Boring is a compliment here. A lot of "AI" features do not need a model that writes sentences. They need to recognise something — an object, a sound, a pattern — and act on it. That is not generation. That is classic machine learning, and Core ML has done it well for a long time. The mistake I keep seeing in 2026 is teams reaching for a language model to do a job a feature print and a bit of maths would do faster, cheaper, and fully on the phone.
To show it, I built a small app called Teachable Camera. You point it at something, give it a name, and it learns to spot that thing live. No training run, no server, no cost. The full project is on GitHub: teachable-camera. Everything below is real code from it.
What it does
You open the app to a live camera. Tap Teach, type a name, and take a few photos of an object from different angles. Tap Done, and the app now recognises that object — it draws a name and a confidence bar the moment it sees it again.
Here it is with my son's toy train. I taught it with about ten photos, then pointed the camera back at the train:
The part I like most is that it can tell similar things apart. Here I taught it two mugs — my son's colourful one and my plain white one. It keeps them straight, and says "Not sure" in the gap while I swap them:
Notice what it does when it does not recognise something: it says "Not sure" with no number. It never shows a confidence it cannot back up. I will come back to why that honesty matters.
Why Core ML, and not a language model
Hold the question from Part 1 in your head: do you use the intelligence Apple ships, or bring your own — and does the job even need a generative model?
Recognising your specific keys, or your mug, is a pattern-matching job, not a writing job. A language model could describe a photo for you, but it does not know your mug from a shop full of mugs, and asking it every frame would be slow, heavy, and pointless. What you actually need is a way to turn an image into a compact "shape", and a way to measure whether two shapes are alike. That is exactly what Core ML and Vision give you — small, fast, and running on the Neural Engine, so nothing leaves the phone and there is no bill.
If the job is recognise this, reach for Core ML before you reach for a model that writes.
The whole picture
Before the code, here is the shape of the app. One feature extractor feeds two jobs — teaching and recognising:
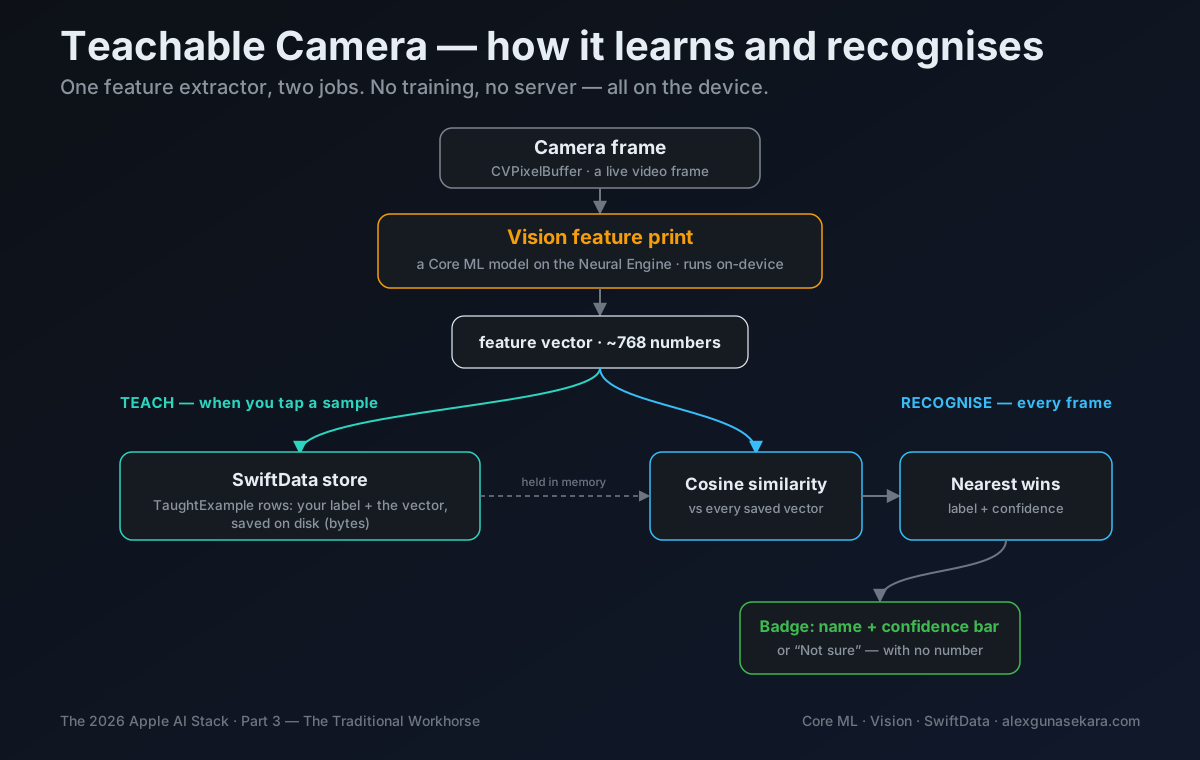
Every camera frame becomes a feature print — a list of numbers that describes the image. When you teach, the app saves that list plus your label. When it recognises, it compares the current list against every saved one and picks the closest match.
If you have built a RAG system, this will feel familiar: it is an embedding model, a vector store, and a similarity search — the same three pieces. The differences are that the embeddings are of images, not text, everything runs on-device instead of a cloud API, and instead of pulling the top few results to feed an LLM, we take the single nearest one and read its label. Same idea, no server, no generation.
Now let me build it from the front.
Step 1 — turn an image into numbers
The heart of the app is one function that turns a camera frame into a feature print. Vision does the heavy lifting; the model behind it is a Core ML model that runs on the Neural Engine.
import Vision

nonisolated enum FeatureExtractor {

    // Make a feature print for a live camera frame.
    static func vector(from pixelBuffer: CVPixelBuffer,
                       orientation: CGImagePropertyOrientation = .up) throws -> [Float] {
        let request = VNGenerateImageFeaturePrintRequest()
        let handler = VNImageRequestHandler(cvPixelBuffer: pixelBuffer,
                                            orientation: orientation,
                                            options: [:])
        try handler.perform([request])
        return try floats(from: request)
    }
}
Three lines do the work. VNGenerateImageFeaturePrintRequest says what you want — a feature print. VNImageRequestHandler says which image. perform runs the Core ML model on the frame. You never see the model or write any maths; Apple ships it.
The result comes back as raw bytes, so I read them out as Float:
private static func floats(from request: VNGenerateImageFeaturePrintRequest) throws -> [Float] {
    guard let observation = request.results?.first else { throw ExtractionError.noResult }
    let count = observation.elementCount            // e.g. ~768 — the model tells us
    var result = [Float](repeating: 0, count: count)
    observation.data.withUnsafeBytes { raw in
        let source = raw.bindMemory(to: Float.self)
        for i in 0..<count { result[i] = source[i] }
    }
    return result
}
The key idea is this: two photos of the same thing give feature prints that are close together; two different things give prints that are far apart. That closeness is the whole trick. Note that I never hardcode the size — elementCount tells me how long the vector is (currently around 768 numbers). And the whole type is marked nonisolated, which matters a lot for threading — more on that soon.
Step 2 — remember what you taught
Each taught photo is one row in the on-device database. It holds two things: the label you typed, and the feature print for that photo.
import SwiftData

@Model
final class TaughtExample {
    var label: String     // "Kevon's train"
    var vector: Data      // the feature print, packed as bytes
    var createdAt: Date

    init(label: String, vector: Data, createdAt: Date = .now) {
        self.label = label
        self.vector = vector
        self.createdAt = createdAt
    }
}
I store the numbers as Data (raw bytes), not as [Float]. Bytes are small on disk and simple for SwiftData to save. I only turn them back into floats when I need to compare. That conversion is two tiny helpers:
extension Array where Element == Float {
    var asData: Data { withUnsafeBytes { Data($0) } }              // floats → bytes
    init(data: Data) { self = data.withUnsafeBytes { Array($0.bindMemory(to: Float.self)) } }  // bytes → floats
}
The store itself is one shared SwiftData container for the whole app. Nothing in it leaves the device.
enum AppModelContainer {
    static let shared: ModelContainer = {
        let schema = Schema([TaughtExample.self])
        let configuration = ModelConfiguration(schema: schema, isStoredInMemoryOnly: false)
        do {
            return try ModelContainer(for: schema, configurations: [configuration])
        } catch {
            fatalError("Could not create the Teachable Camera store: \(error)")
        }
    }()
}
Step 3 — recognise by nearest neighbour
Here is the "model" that grows on the phone. It holds every taught print in memory. To recognise a new image, it finds the taught print that points in the most similar direction. That is it — no training step.
@MainActor
@Observable
final class TeachableClassifier {

    // Everything taught, kept unpacked in memory so we do not decode bytes every frame.
    private var examples: [(label: String, vector: [Float])] = []

    // Load from the store into memory. Called at startup and after teaching.
    func reload(from context: ModelContext) {
        let saved = (try? context.fetch(FetchDescriptor<TaughtExample>())) ?? []
        examples = saved.map { (label: $0.label, vector: [Float](data: $0.vector)) }
    }

    // Teach one photo: save it to disk and add it to memory.
    func teach(label: String, vector: [Float], context: ModelContext) {
        let example = TaughtExample(label: label, vector: vector.asData)
        context.insert(example)
        try? context.save()
        examples.append((label: label, vector: vector))
    }
}
Notice teach writes to both places — disk (so it survives a restart) and the in-memory array (so the very next frame can already match it). Reading the database on every camera frame would be far too slow; the in-memory array is the hot path, exactly like the index a vector database keeps in RAM.
Recognising is a plain loop. Compare the live print against every saved one with cosine similarity, and keep the closest.
func predict(_ vector: [Float]) -> Prediction? {
    guard !examples.isEmpty else { return nil }

    var bestLabel = ""
    var bestScore = -Double.infinity
    for example in examples {
        let score = Self.cosineSimilarity(vector, example.vector)
        if score > bestScore { bestScore = score; bestLabel = example.label }
    }

    // A raw cosine of ~0.5 does not mean "50% sure" — everyday images are never
    // truly unrelated. Rescale from a floor: at or below `floor` counts as 0%,
    // and only a strong match nears 100%.
    let floor = 0.55
    let confidence = max(0, min(1, (bestScore - floor) / (1 - floor)))
    return Prediction(label: bestLabel, confidence: confidence)
}
One detail worth stopping on: the raw cosine score is not the percentage you show. Two everyday photos are never 0% alike, so a raw score of 0.5 is not "half sure" — it is basically nothing. So I rescale from a floor: anything at or below the floor counts as zero, and only a genuinely close match climbs toward 100%. Tune the floor for your objects. This is the difference between a demo that lies and one that feels honest.
That is the entire "model". No training, no model file to ship, no server, no cost — it grows one photo at a time, on the phone.
Step 4 — from camera to screen
Two more pieces wire the live camera to that classifier. CameraService runs the capture session and hands out each frame:
nonisolated final class CameraService: NSObject, @unchecked Sendable {

    let session = AVCaptureSession()
    var onFrame: (@Sendable (CVPixelBuffer) -> Void)?

    private let sessionQueue = DispatchQueue(label: "TeachableCamera.session")
    // … configures a back-camera input and a live-frame output …
}

extension CameraService: AVCaptureVideoDataOutputSampleBufferDelegate {
    func captureOutput(_ output: AVCaptureOutput, didOutput sampleBuffer: CMSampleBuffer,
                       from connection: AVCaptureConnection) {
        guard let pixelBuffer = CMSampleBufferGetImageBuffer(sampleBuffer) else { return }
        onFrame?(pixelBuffer)   // hand the frame to whoever is listening
    }
}
RecognizerModel is the brain that connects everything. It owns the camera and the classifier, turns each frame into a print, asks the classifier what it is, and publishes the answer for the views to read.
@MainActor
@Observable
final class RecognizerModel {

    let camera = CameraService()
    let classifier = TeachableClassifier()
    var prediction: Prediction?
    private(set) var latestVector: [Float]?

    func start(context: ModelContext) async {
        classifier.reload(from: context)          // load past examples

        camera.onFrame = { [weak self] pixelBuffer in
            // On the camera's background queue: make the print here, it is fast.
            guard let vector = try? FeatureExtractor.vector(from: pixelBuffer, orientation: .right)
            else { return }
            Task { @MainActor in self?.handle(vector) }   // hop to the main actor for the UI
        }

        cameraDenied = !(await camera.start())
    }

    private func handle(_ vector: [Float]) {
        latestVector = vector                     // the teach flow reuses this
        guard let raw = classifier.predict(vector) else { prediction = nil; return }
        // …smooth the confidence so the bar glides instead of jumping…
        prediction = Prediction(label: raw.label, confidence: smoothedConfidence)
    }
}
There are two loops sharing this one pipeline. Recognise runs constantly: every frame becomes a print and gets a guess. Teach does not start a new camera read at all — when you tap the shutter, it grabs the latestVector the recognise loop already made and saves it with your label. That is why teaching feels instant.
Swift 6 concurrency, by example
This is the part I did not expect to write, and the part I am most glad to. Before publishing the code, I turned the project up to Swift 6 language mode — the strict one, where the compiler checks for data races at build time. This app is a perfect test, because it lives on two threads at once: camera frames arrive on a background queue, but the UI can only be touched on the main actor. Get that boundary wrong and you get a crash that shows up once a week and never in the debugger.
Here is what each 2026 concurrency keyword means, and where it earns its place in this app.
SWIFT_DEFAULT_ACTOR_ISOLATION = MainActor — a project setting that makes every new type belong to the main actor by default. Great for a UI app: your view models are main-actor without you typing anything. But it means the few things that must run off the main actor now have to say so out loud.
@MainActor — "this runs on the main thread." RecognizerModel and TeachableClassifier are here. All the UI-facing state — the current prediction, the taught examples — lives on one thread, so there is nothing to race.
@Observable — how SwiftUI watches the model and redraws when prediction changes. It is the modern replacement for ObservableObject, with no @Published boilerplate.
nonisolated — "this does not belong to the main actor." When I switched to Swift 6, the compiler stopped the build with a real error: FeatureExtractor was main-actor by default, but I call it on the camera's background queue. That is illegal, and correctly so. The fix is to mark the extractor nonisolated, because it is stateless work that should run off the main thread. Same for the whole CameraService. The error was not noise — it was the compiler pointing at the exact seam where a race could live, and making me name the boundary.
@Sendable — "this closure is safe to hand to another thread." The onFrame callback crosses from the camera's queue into my code, so it carries this promise.
@unchecked Sendable — "trust me, I have made this safe by hand." CameraService is shared between threads, but I keep every touch of the capture session on one private queue. The compiler cannot verify that rule, so I take responsibility for it with @unchecked — and keep the promise in the code.
@preconcurrency import AVFoundation — AVFoundation is an older framework that has not been fully annotated for strict concurrency yet. This import quietens the warnings that come from its gaps, not mine, so the real issues stay visible.
withCheckedContinuation — a bridge from old callback-style code to modern async/await. Starting the capture session is a blocking call that must run on the background queue; this wraps it so my start() can simply be awaited.
Task { @MainActor in … } — the hop home. After I make the feature print on the background queue, I need to update the UI, which must happen on the main actor. This one line carries the result across.
The payoff is not that the code looks clever. It is that the compiler now proves the threading is correct, instead of me hoping it is. For a camera app that updates the screen thirty times a second, that is worth a great deal.
Being honest on screen
One small design choice does more for trust than anything else: the app never shows a number it cannot stand behind. Above a confidence line, it shows the name and a bar. Below it, it shows "Not sure" — with no percentage at all.
private var isConfident: Bool { prediction.confidence >= minConfidence }

var body: some View {
    if isConfident {
        confidentCard          // name + confidence bar + a green seal
    } else {
        notSurePrompt          // "Not sure — point at something you taught", no number
    }
}
A model that always prints a percentage teaches people to distrust it, because sooner or later it says "80%" about something wrong. A model that sometimes says "I don't know" earns the opposite. You saw it in the videos — when the camera looked away, it stopped guessing.
Gotchas from building it
A few honest notes, the kind I wish articles included.
- Orientation. The feature print depends on which way the image is turned. I fix it to one orientation and lock the app to portrait, so teaching and recognising always agree. If they disagree, recognition quietly gets worse and you will not know why.
- Tune the floor and the confidence line together. The
floorinpredictdecides what counts as "nothing", andminConfidencein the UI decides when to show a name. Set them for your objects. Higher is stricter. - A feature print runs on every frame. That is fine — Vision is fast, and the camera drops frames it falls behind on, so recognition always uses a fresh one. If you want to save battery, you can run it less often.
- Prefer honesty over a number. Rescale the score, and stay silent when you are unsure.
Where this goes next: portable knowledge
Here is a thought that makes this pattern bigger than one app. The thing you teach is just data — a label and a list of numbers. There is no model to ship. And because the feature print comes from Apple's fixed, shipped Vision model, a vector made on my phone lands in the same space as a vector made on yours. They are directly comparable.
That means the taught set is portable. You could export it as a small file, hand it to a friend, and their app would recognise your objects without teaching them again. You could ship a "starter pack" — common tools, parts, plants — as a download, so a new user is useful on day one. You could even let a team pool what they teach into one shared set in the cloud, and everyone pulls it down. All of that, and still no training run — you are only ever moving a list of numbers around.
There is a privacy bonus baked in. You are sharing feature prints, not photos. You generally cannot rebuild the original image from its print, so a shared set leaks far less than a shared photo album would. For a lot of real products, that is the difference between "we can sync this" and "we can't."
One honest catch, so you build it right: feature prints are only comparable within the same Vision revision. Apple improves that model over time, and when the revision changes, the numbers change with it. So a portable set must carry the revision it was made with, and the app should refuse a mismatch (or quietly re-teach from photos if it kept them). Store the revision next to the vectors and this stays safe.
I am not building the cloud side in this sample — that is a whole project of its own, and off the point here. But it is worth seeing the shape of it: because the hard part (the model) is already on every device, sharing what you teach is a data problem, not a machine-learning one. That is a rare and pleasant place to be.
When this is the right layer
Come back to the map. In 2026 you have three real ways to add intelligence to an Apple app, and they do not compete — they cover different jobs.
- Core ML — recognise, sort, match. Vision, sound, tabular data. On-device, tiny, free, instant. When the job is "is this the thing?", this is the answer. It was never generative, and it does not need to be.
- Foundation Models — reason and generate. Apple's on-device language model, for turning messy input into structured output or answering in your own words. That was Part 2.
- Core AI — bring your own generative model and run it on Apple silicon. That is coming in Part 5.
Teachable Camera is small, but the pattern inside it is not: a feature print plus a nearest-neighbour search is a complete, on-device, personalised classifier. No training pipeline, no labels bought in bulk, no server. The user teaches it, on their phone, with their things. For a whole class of "recognise my X" features, that is not a fallback for when you cannot afford a big model — it is the better design.
Next in the series I pick up the workbench off to the side of the map — MLX, where you build and shape the models that the newer layers run.